Showing posts with label easy hairstyles. Show all posts

Sunday, July 24, 2016

3 Tips to Add Some Pizazz to Your Braided Hairstyles

Hey, everybody!
 
 
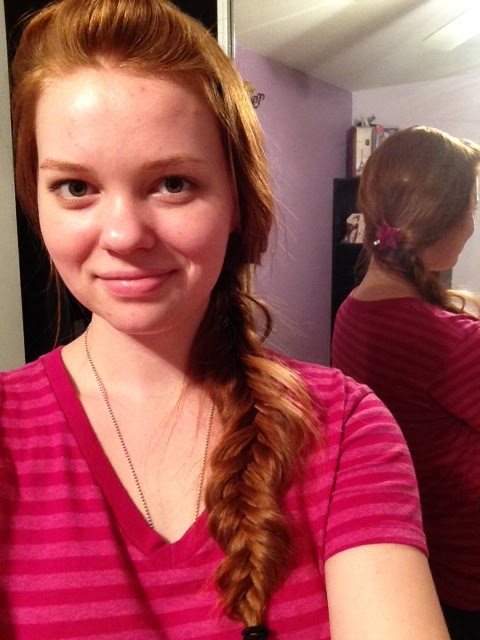
I took this picture of my braided hair a while ago, but today it inspired me to share three quick tips with you about how to add some extra pizazz to your braided hairstyles.
 
1.) "Pancaking"-- This is a technique where you pull apart the braid just a bit to add some extra volume. You start off with your hair braided normally, and then you pull at both sides of the braid to kind of poof it out. If you're confused by my description, I can make a video and show you how to do it. Just leave a request below! (and in case you're wondering why this technique is called "pancaking," I have no idea. Maybe because your hair is as flat as a pancake beforehand?)
 
2.) Add an accessory! -- You can add a little unique flair to your 'do by adding a hair clip, a headband, or even a hat. I chose to use a sparkly star clip at the base of my braid in the picture below (look at my reflection in the mirror). It's kind of an unexpected placement since most people tend to wear their clips on the side of their heads.
 
3.) Frame your face -- Pull out a couple stands of hair around your face to add some framing. This also gives your braid a softer, lived-in look. A braid without any wisps of hair around your face can look severe and boring, so I definitely recommend giving this a try!
 
And that's it! I hope you enjoyed reading this post, and that you gleaned a few new ideas to use the next time you braid your hair. So tell me, do you like wearing braids in your hair?
 
~ Kendra :)

Saturday, September 5, 2015

Pinterest Tutorial - French Braided Updo

Hey, everybody! In continuation with the idea from yesterday's post, here is another one of my attempts at following a Pinterest hair tutorial! Today I tried out a French braided updo. Click on the photo to go to the pin (sorry, my pin didn't link to the original instructions).
 
https://www.pinterest.com/pin/519673244480554775/
 
I thought this would be a pretty simple hairstyle to try, and it is-- as long as you don't French braid the middle of your head! I tried this tutorial yesterday, but I had grabbed too much hair near the middle of my head while I French braided, and I ended up with French braided pigtails.:P You need the middle piece of your hair unbraided so that you can braid it later! I gave up on it last night, but I gave it another try today. My second attempt, where I grabbed less hair to start braiding with, was much more successful.


The supplies I used for this were a brush, three hair elastics, some bobby pins, and a flower clip. I would suggest using hairspray on your updo before you add a decoration. The hairspray will help keep your look in place throughout the day.
 
So here are the instructions--
1.) Brush your hair out, then grab a small section near the top of your head to start French braiding (if you don't know how to French braid, leave me a comment and I make a tutorial, or you can look up a tutorial on YouTube or Pinterest).
2.) Finish French braiding near the nape of your neck, then braid normally a couple more times. Secure with an elastic. Repeat on the other side of your head, making sure that you have a medium sized piece of unbraided hair in between the two French braids.
3.) Once the braids are finished and secured with elastics, braid your French braids and the free piece of hair in the middle of your head together until you reach the end of your hair. Finish with an elastic. You should now have one braid.
4.) Take the braid and roll it up to the nape of your neck to form a rolled updo. Secure with as many bobby pins as you need, and check in the mirror to see if you have any pieces of hair that need to be pinned down.
5.) Set with hairspray, and finish with a cute accessory-- like a flower, a bow, or a headband.
 
While I pinned my bangs back for this style, this hairstyle would look really cute if you wore your bangs down (if you have bangs). Either way, I think this look is super cute, and it would be great to wear on a hot day, if you want your hair off of your neck. You could even do this style with wet hair!
 
So what do you think of this style?
 
~Kendra :)

Friday, September 4, 2015

Pinterest Hairstyle - Braided Bangs with Waves

Hi, everybody! So today, I wanted to share with you a hairstyle that I tried out this evening. Have you ever seen those articles about "Real Women Try Pinterest Tutorials," where real women try out hairstyles and things from Pinterest and compare the final results to the model? Well, this is my version of that!

This is the original tutorial for the hairstyle I tried today. Click on the photo to go to the original post.


http://www.hercampus.com/beauty/5-gorgeous-beach-hairstyles-rock-summer?page=3

So that is how it's supposed to look at the end, right? Here is my final look.


I realized that I didn't get much detail of the braid, so I took another photo.


 In the tutorial, when you curl your hair, you apparently shouldn't use the clamp on the curling iron, but should just wind your hair around the iron. I just used a wand instead. Compared to the model, I braided my hair on the opposite side of my head, and my hair isn't quite as curly as hers. Also, my hair is not blonde, and I have bangs while the model doesn't, so those will also factor into the end results too. Even though my finished style doesn't look exactly like the model's picture, I liked the results nonetheless. I'll describe my process so if you want to get the look, you can!

1.) I made a deep part on one side of my head, but it wasn't totally straight. I let my bangs part slightly farther on my hairline than the rest of my hair (if that makes sense :P).  I have short bangs that are cut across my forehead, so I had to use those in my braid. I French braided from one side of my head to the other, then used two, strong bobby pins to hold the braid in place behind my ear. Bonus points if you can make the pins hide in your hair!
2.) I used a large barreled curling wand to curl random pieces of hair. I curled all of my hair, but it wasn't systematic.  I didn't curl near the top of my head, instead I went to about the middle of my piece of hair and wrapped from there. No small pieces of hair either, I wanted larger chunks for more wave and less curl.
3.) All done! You can finish your hair with hairspray to keep it in place. This style took me about ten minutes to do.

So what do you think? Do you want to give this look a try?

~Kendra :)

Saturday, April 6, 2013

Easy Braided Bun Tutorial


Hey everybody! Just a couple of days ago, I did my hair in this cute bun hairstyle.


This look is super easy to re-create. I mean, if I can do it, you can too! Here is what you will need-
  • Headband (optional)
  • Bobby pins (NOT optional!;)
  • A cute hair bow elastic (optional)

Here is what you are going to do-
  1. Braid your whole head of hair into one big braid.(you might want to gather your hair into a ponytail and then braid the tail- it's up to you! I don't do that though.)
  2. Now you are going to wrap your braid into a bun and secure with bobby pins (see, the pins are SO not optional!;)
  3. Now it's time for accessories, to jazz up your bun! You can slide a cute elastic over your bun, to the base of the bun (like in the picture), you can put on a headband (I did, but I didn't get a picture. I just used the simple black one in the photo of the supplies.), or you can do both!
And that's it! My first time forming the bun on the day I did this, my bun was kinda lopsided. So I re-did it. It might take a couple of tries to get it straight, but you'll get it.:) Do you like doing your hair? If you have any fun tutorials, leave a comment below!